Showing posts with label desserts. Show all posts

25.8.13

Butterscotch Chip Cookies


I brought these cookies into the office the other day and there was almost a riot when I ran out.  These come highly recommended!!  The secret ingredient is some cream cheese - adds an interesting texture and tang to the cookies.  You'll definitely have to let me know how these go over if you end up making them.

P.S. I just realized these are the first cookies I've posted to this blog. I'm going to celebrate with a glass of wine.  Fine, it's an excuse to drink wine. 

You'll need... (for about 20 cookies)

1 stick of butter (room temperature)
4 oz of cream cheese (half a package)
1/2 cup of granulated sugar
3/4 cup of packed brown sugar
1 egg
1 tsp vanilla
2 cups of all purpose flour
1/2 tsp of baking soda
1/2 tsp salt
8 oz of butterscotch chips


Ok!  Throw in your butter and cream cheese into a mixer and cream that together really well... like 2 minutes on high well.


Should look like this when you're through.


Next you'll add both the brown and granulated sugar, and mix until fully incorporated to the cheese and butter.


It should look pretty similar to this!  


You'll then want to add the egg and the vanilla and mix until everything comes together.


Action shot!


OK! We can move on to the dry ingredients.  You'll want to mix together the flour, salt, and baking soda ... you can sift it if you like but that just dirties another tool and I am against doing dishes.  


Slowly add this to the butter mixture on a low speed.  You don't want to over mix it because the cookies will turn out tough.  Just do it to the point where everything looks like it has come together.


You'll then want to fold in the butterscotch chips with a spatula, then cover and refrigerate the dough for about 2 hours.  This will allow the butter to harden up again, and your cookies won't spread out as much when you bake them.

When the two hours is up you'll want to preheat your oven to 350 degrees, then scoop the dough into about 1 1/2 inch balls on some lined cookie sheets.  If you overcrowd the pan, the cookies will all run together and not bake properly.  TRUST ME.  (Bad past experience).  


Bake these babies for 10-12 minutes, turning the pan halfway through to make sure everything is cooking evenly.  My oven is pretty hot, I took them out almost exactly at 10 minutes.


Let them sit on the pan for a couple of minutes (they will be really soft at first), then move them to cool on a wire rack.


Ta daaaaa!!  You're done!  Store these in a tupperware container or a ziplock bag, they should stay soft and delicious for about 3-5 days.  I'm just guessing, the batch I made lasted about 3 hours.

Enjoy!

Courtzilla

27.6.10

The Best Birthday Cake


Time to get serious.  Two cake layers.  Double the frosting.  Mass amounts of sprinkles.  This cake was for my roommate Aly, but I'm posting in celebration of someone else's birthday... MINE!  I'm hoping you'll make me one of these. Deal?  Birthday's July 9th... you know in case you were wondering.

 Recipe yoinked from Deb over at Smitten Kitchen


You'll need:
- 2 9" cake pans, can be round, square - whatever strikes your fancy.
- 4 cups plus 2 tablespoons cake flour
- 2 teaspoons baking powder
- 1 1/2 teaspoons baking soda
- 1 teaspoon salt
- 2 sticks unsalted butter, softened
- 2 cups sugar
- 2 teaspoons pure vanilla extract
- 4 large eggs
- 2 cups buttermilk


Alrighty!  First you'll want to butter and flour your pans.  Grease up the pans with a bit of butter, then pour a small bit of flour in the pan.  Shake it around until the whole pan is covered with flour, then shake out the excess.  Should look like this....


Ok!  Now, mix together the flour, baking powder, baking soda, and salt in a bowl. 


In another larger bowl, beat together the butter and sugar until fluffy, and then add the vanilla.


Add your eggs one at a time.  Make sure you scrape the sides of the bowl down after each egg, so we can guarantee it's all been mixed together perfectly.  After that, slowly add your buttermilk until just combined.  Then you can add you flour in 3 batches, beating after each batch.  Make sure you stir/beat it until it's just mixed together.  If you over beat the flour you can wind up beating out the moisture from the cake.  What's the point of cake without moisture?  Oh wait, frosting. I forgot.


Pour the batter into your cake pans, and put them in a 350 degree oven for 35 to 40 minutes.


VOILA!


Alrighty.  Now in order to stack these so they line up and don't look like a soccer ball, we have to cut off the rounded tops.  I think it's easiest to do this once they've cooled with a big knife while they are still in the pan.  That way you get perfect measurements, and the two cakes will line up perfectly.


Now, take on half of your cake, and spread frosting on the top of it.  Let's be honest here - I got lazy and bought frosting in a can.  SO SUE ME.


Now turn the other half of the cake upside down, and plop it down ever-so-gracefully on top.


Here's another trick for you, slide 3 pieces of parchment or wax paper under the cake, so none of the rim of the cake touches the plate/counter.  That way when you're done frosting you can pull away the parchment, and it won't make a mess.  THANKS MARTHA STEWART YOU'RE THE BEST.  Don't even act like you don't watch her show religiously.

An easy way to frost a cake is to put a "crumb layer" of frosting on first.  Just a thin layer that will hold down all the crumbs so they don't peel off and get everywhere.


We're going for function here, not beauty.

Now, get the rest of the frosting on there.  Lay it on reallll thick.  Like sarcasm.


Sprinkles anyone?


Ta daaaa! Aren't you impressed?  Now you can pipe your favorite roommate's name on top.  Apparently I need to work on my piping skills.  Pull away the parchment paper at the bottom, and you are ready to throw a birthday party.


I'll be expecting my cakes no later than the 8th of July.

Enjoy!!

<3<3Courtzilla

11.4.10

Texas Chocolate Sheet Cake


 Texas sheet cake.  Why do they call it "Texas" sheet cake?  I have no idea.  One thought is that it may be called that because it makes enough cake to feed the entire state of Texas.  I wish I was kidding.  Might want to halve this recipe unless you're planning on going up a pant size.

What you'll need:
- 2 cups of flour
- 2 cups of sugar
-1/4 tsp salt
- 4 heaping tablespoons of cocoa.  If you're feeling fancy use the dutch process fancy pants kind.  If you're me use Hershey's.
- 1/2 tablespoon instant coffee grounds
- 1/2 cup buttermilk
- 1 cup boiling water
- 2 beaten eggs
- 1 teaspoon baking soda
- 1 teaspoon vanilla extract
- 1 sweet dinosaur cupcake pan (optional)

Let's get crackin.

First things first, boil your water so it's ready to go.  Simple enough.


Ballin'.  Alrighty, now in a mixing bowl stir together your flour, sugar and salt.


Here's where things get serious.  Melt TWO sticks of butter in a medium sized pot.  Oh, be still my heart.


To the melted butter, add your cocoa and coffee.  Quirky fact: adding instant coffee to your chocolate cake/chocolate chip cookies will make Hershey's cocoa taste more rich.  See?  Learning all kinds of things today aren't we.

 
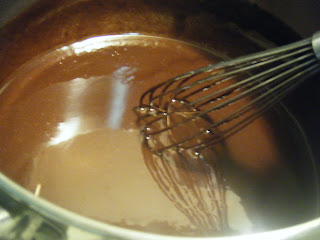
Now, add the boiling water to the chocolate/butter mixture.


Take a sniff.  Die a little.

Let this boil for about 30 seconds, then turn off the heat.  Pour the chocolate on top of your flour, and stir to combine.  You'll want to hang out a bit and let that cool down.


Forgive my yellow bowl, it does not realize what it does to pictures.

While that's cooling off, measure out your buttermilk in a measuring cup.  Add the baking soda, vanilla and eggs and whisk it around to combine.


If your flour/chocolate has cooled down enough, mix it together with the buttermilk mixture.  Make sure it's cool though, or else you'll wind up with scrambled eggs, and I'm sorry, but scrambled egg chocolate sheet cake just doesn't have the same ring to it.


Pour this onto a sheet pan and bake at 350 degrees for about 20 minutes.  I don't have a sheet pan with rims that high, so I used my trusty 9 x 13" pan.  NBD.


After I got the batter into that pan, I realized... I still have a ton of batter left.  There's only one reasonable solution to such a problem.


DINOSAUR CUPCAKES.  I'm sorry, but just bask in the glory of this awesome pan.  Are you jealous you don't have one??!??!

You could make a frosting for this cake, but why?  It's honestly so moist and so rich, just a dusting of powdered sugar will do.  Make sure the cake is completely cool though, or else the powdered sugar will just melt into the cake.


Delicious.  As for the dino cupcakes?


I had no problem getting rid of those.


Ahahahhaa.  I love that pan.

Enjoy!

<3 Courtzilla

9.9.09

Dimply Strawberry Cake


This is kinda less of a cake, and more of a fat kid breakfast. It's not super sweet...and yet you find yourself craving milk. I loved it! Clearly, I belong in fat kid camp. Who wants to watch Heavyweights with me??

But seriously. This was originally going to be the cake to show off my uber cute baby plums... but they went bad before I could use them. And I cried. For DAYS. And then I ate cake and got over it.

You'll need:

-1 1/2 cups of flour
- 2 tsp baking powder
- 1/4 tsp of salt
- 1/4 tsp of cinnamon
- 5 tablespoons of butter
- 3/4 cup packed brown sugar
- 2 tsp of vanilla extract
- 2 large eggs
- zest from one orange (which I didn't have, and I didn't think lime zest would be the best alternative....)
- 1/3 cup canola or vegetable oil
- cute baby plums.... orrrr whatever fruit you've got.

First thing's first... preheat your oven to 350 degrees!

Then, butter and flour your pan. Seriously, it's exactly how it sounds. You rub butter around the inside of the pan, then sprinkle flour over it. It helps the cake to come out of the pan clean!


Ok, in a medium sized bowl, whisk together your flour, baking powder, cinnamon, and salt.


Perfect, you're doing so swell.

Alrighty then. Take your softened butter, and put it in another larger bowl. You'll want to mix the butter until it gets light and creamy. Once it's at that stage, add the brown sugar. After a couple minutes it'll look like so...


SUPER appetizing, right?

Ok, now you'll want to add your eggs, one at a time. Afterwards beat each egg on high for about 1 minute. This will thicken up your batter.

At this point, add in your vanilla, zest, and oil and beat until incorporated. I bet this would've been great with the zest. Sighhhh.

Ok, now slowly add in your flour, until it looks like this:


Beautiful! Now pour it in your pan, and level it out so it'll bake evenly.


The swirlage is not necessary in the least.

Now you'll want to add the fruit. As I said, all I had were strawberries... so I wanted to make the most of it. I made this.

Not bad right?

Ok, now you just throw it in the oven, and let it sit for about 40 minutes.

Or at least it should be that simple.

If you used less juicy plums.

If you used strawberries or another juicy fruit (remind me to tell you about my blackberry scone failure), let me show you a trick.

So, I peeked in the over at about the 20 minute mark.


Action shot blur, that's when you know this is getting intense.

Basically what was happening, was 1) my strawberry flower was doomed, and 2) the outsides were cooking way quicker than the middle where all the juicy strawberries were keeping things moist. Moist. What a gross word.

Here's what you do. Make it a foil jacket. It'll totally thank you later.


Just look at it! All dressed up for it's first day of school.

But seriously, the foil will help protect the outsides, while allowing the middle to cook all the way through. How I bombed chemistry, I'll never know.

Twenty minutes later, BAHAHAH!! Perfection.... other than my fail-tastic strawberry flower thingy.


Look how cute and dimply it is.


You'll want to let it cool for about 10 minutes, by the way.

To take it up a notch, I sprinkled a bit of powdered sugar on top.


Beeeeeautiful. Ain't she pretty?

Then cut it up into squares, and serve!


AND DEMOLISH.


Nom nom nom.

Enjoy!

<3 Courtzilla